
Showing posts with label sally hansen. Show all posts
Showing posts with label sally hansen. Show all posts
Monday, August 13, 2012
31 Day Nail Art Challenge, Day 13, Animal Print
Since I have been doing a lot of muted polishes lately, I decided that I should do a brighter color that was out of my comfort zone on this challenge. For my base I used two coats of my Migi Nail Art Pen's pink and then did leopard spots using Migi's black and Sally Hansen's Xtreme Wear Celeb City. I did the leopard nails using this wonderful tutorial by Chalkboard Nails. Her nails are seriously so amazing, I highly recommend you check her out and follow her, she's one of my biggest inspirations. For added flair, I topped the manicure with Pure Ice's Don't You Wish. I love this glitter polish because the pieces are so tiny, it's a subtle glitter polish that really shines with the light. Overall, I really liked this manicure, and it definitely brought me out of my comfort zone. I love leopard print, and I think I'll venture out and use brighter polishes with it more often!

Saturday, August 11, 2012
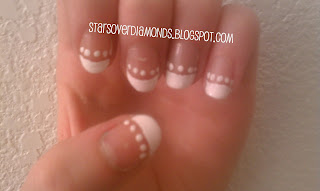
31 Day Nail Art Challenge, Day 11, Polka Dots
Since I've done two polka dot-esque manicures already, I decided to do a simple manicure that has polka dots, but not as much as my rainbow one. I saw this over at The Beauty Department and decided to do an even quicker version of it on my nails today. (Instead of adding one and a half rows of dots, I just did the one row underneath.) I really like this version of the french because it is still classy and easy, but has enough flair to be unique. I just put a coat of Sally Hansen hardener on my nails then used Sally Hansen's Xtreme Wear White on for the tips and dots. I hope you enjoy! xx

Thursday, August 9, 2012
31 Day Nail Art Challenge, Day 9, Rainbow Nails
For today, I was sorta stumped on how to do today's challenge, because I don't really like just painting each one of my nails a completely different color unless it is in like a gradient or has a visible pattern (like red, white, and blue). But then I cam up with an easy idea that I really enjoyed wearing! Today's manicure creates a very cute look but is super easy to do! It doesn't even take a lot of time, just a steady hand and quite a few polishes. For my base color I used two coats of Foreverr 21's Taupe polish. I then added dots with a dotting tool . The colors from bottom to top were Wet n Wild's I Red a Good Book, NYC's Times Square, Sally Hansen's Xtreme Wear Mellow Yellow, Maybelline's Color Show Go Go Green, Wet n Wild's I Need a Refresh-mint, and finally Wet n Wild's On a Trip. I love how it almost has a mosiac look to it when my hand is farther away. I was actually surprised at how well it turned out in such a short amount of time. I think I will end up trying it with just using warm colors (reds, oranges, yellows) or cool colors (greens, blues, purples) to see the effect it has. How do you feel about rainbow nails? Do you like having a lot of different colors on your hand?


Wednesday, August 8, 2012
31 Day Nail Art Challenge, Day 8, Metallic Nails
I was really excited to do today's post because for my birthday about a month ago my boyfriend bought me a bunch of cute polishes, including Sally Hansen's Xtreme wear Celeb City. I love how much this polish shines, it's exactly like foil. The only downside to this polish is that its shimmer makes it a little streaky. For this manicure I used three coats of Celeb City for an even base coat then added tips with Forever 21's light grey. I like this particular polish because it is just a nice, flat grey and is a perfect neutral polish for the work place. Its formula is nice too, even coverage can be obtained in about three coats also. There is also some minor streaking with this polish, but it settles pretty well. Overall, I enjoyed doing this manicure, and it makes for a cute twist on the regular french nails.


Tuesday, August 7, 2012
31 Day Nail Art Challenge, Day 7, Black and White Nails
For today's post I did perhaps one of the easiest nail art designs I've ever done, the plastic wrap technique. Basically, it's where you scrunch up a piece of plastic wrap, put nail polish on the plastic, then dab it onto your computer. A good, short video of it can be found here. For my white base I used Sally Hansen's Xtreme Wear White On, which is a pure white and goes on evenly and has full coverage in two-three coats. All of the polishes in Xtreme Wear seem to have a nice, thick formula in my opinion. For the black I used my Migi Nail Art Black because I felt that it would be better to have a thick formula to put on the plastic wrap so it wouldn't smear as much when I dabbed it on. Overall I like how it turned out, almost abstract in my opinion. To make the manicure a little more interesting I put on Sephora's matte coat to finish it.
 I like how my ring finger, pink, and thumb turned out more than my pointer and middle finger. On those two, I think I used to much polish and should have scrunched up the plastic into a smaller ball. I think anybody can get some really awesome designs just playing with the shape and amount of plastic.


Overall I think this is one of the easiest manicures to do and I definitely will be doing this again!
Tuesday, July 31, 2012
Water Marbling
Sorry I haven't posted anything in a long time! Today I have my first full attempt at water marbling. I used instructions and tips that I remembered from various blogs and Pinterest. I started off trying NYC Long Wearing colors Fuchsia Shock and Times Square Tangerine but it didn't spread exactly the way I wanted to. So instead I used two coats of Maybelline's Color Show Go Go Green as a base and used both the green and Sally Hansen's Xtreme Wear White On to do the marbling. Overall I think this was a really good first attempt, but it did take a long time.


By far the one I think turned out the best was my middle finger on my right hand. The white was completely opaque and the design was interesting.

As for my left hand, the designs weren't as intricate, and the white was a lot more transparent than I would have liked, but I think it still made for a pretty nail design.
 |
| Sorry for the polish staining along the cuticles! |
Tips I learned while researching and doing water marbling are:
1. WORK FAST! The polishes I used at least seemed to dry quickly and then it becomes much harder to marble the colors together.
2. Use filtered water. I read this somewhere on another blog (I can't think of it at the moment) and it seemed to help the colors spread easier.
3. Don't get too complicated, at least at first. When I tried using the NYC colors I had originally planned to use the green, orange, and pink, and do multiple patterns. Between the lack of spreading and time it took for me to add the colors, I just created a disaster. I think if you master two colors first with simpler designs, then you can build up to those crazy, beautiful designs we all see on the internet. Practice IS perfect.
Tomorrow I think I am going to start a 31 day Nail Art Challenge I found over at http://www.galacticlacquer.com/ and show you a great deal on 8 nail polishes I got from Walgreens!
Thursday, July 19, 2012
Batman Nails
So in honor of seeing the Batman movie Friday night, I decided to use some Batman temporary tattoos laying around to do my manicure! I used Sally Hansen Xtreme Wear Mellow Yellow as my base on all my nails. On my thumb, pinky, and middle finger I applied temporary tattoos I got from the kid party section at Walmart. On my ring and pointer finger I did striping with some thick nail tape I had lying around with Migi Nail Art Black polish.


After one of my nails chipped while I was moving some things around, I decided to try a little water marbling with yellow and black Migi Nail Art polish. Needless to say it didn't turn out that well, but I don't think it was too bad for my first attempt.

Are you going to go see the new Batman movie?
Subscribe to:
Posts (Atom)