
Showing posts with label migi. Show all posts
Showing posts with label migi. Show all posts
Monday, August 13, 2012
31 Day Nail Art Challenge, Day 13, Animal Print
Since I have been doing a lot of muted polishes lately, I decided that I should do a brighter color that was out of my comfort zone on this challenge. For my base I used two coats of my Migi Nail Art Pen's pink and then did leopard spots using Migi's black and Sally Hansen's Xtreme Wear Celeb City. I did the leopard nails using this wonderful tutorial by Chalkboard Nails. Her nails are seriously so amazing, I highly recommend you check her out and follow her, she's one of my biggest inspirations. For added flair, I topped the manicure with Pure Ice's Don't You Wish. I love this glitter polish because the pieces are so tiny, it's a subtle glitter polish that really shines with the light. Overall, I really liked this manicure, and it definitely brought me out of my comfort zone. I love leopard print, and I think I'll venture out and use brighter polishes with it more often!


Sunday, August 12, 2012
31 Day Nail Art Challenge, Day 12, Stripes
I'm not very good at doing stripes and I keep meaning to look into buying striping tape, but I almost never buy things online, so I have been reluctant to do so. However, all the manicures look so beautiful with striping tape I should really give Amazon a chance! Anyway, for my base I used Wet n Wild's Wet Cement. In the bottle it looks more like a purplish, grey brown, but on my hand it resembles more of a dark grey/brown without the purple hue. Then I used my Migi Nail Art Pens to add stripes. Overall I think these nails turned out okay, but I think I am going to pick up some striping tape because it gives precision and a look I just cannot do freehand! Do you use striping tape, if so, do you recommend a certain place to get it?


Tuesday, August 7, 2012
31 Day Nail Art Challenge, Day 7, Black and White Nails
For today's post I did perhaps one of the easiest nail art designs I've ever done, the plastic wrap technique. Basically, it's where you scrunch up a piece of plastic wrap, put nail polish on the plastic, then dab it onto your computer. A good, short video of it can be found here. For my white base I used Sally Hansen's Xtreme Wear White On, which is a pure white and goes on evenly and has full coverage in two-three coats. All of the polishes in Xtreme Wear seem to have a nice, thick formula in my opinion. For the black I used my Migi Nail Art Black because I felt that it would be better to have a thick formula to put on the plastic wrap so it wouldn't smear as much when I dabbed it on. Overall I like how it turned out, almost abstract in my opinion. To make the manicure a little more interesting I put on Sephora's matte coat to finish it.
 I like how my ring finger, pink, and thumb turned out more than my pointer and middle finger. On those two, I think I used to much polish and should have scrunched up the plastic into a smaller ball. I think anybody can get some really awesome designs just playing with the shape and amount of plastic.


Overall I think this is one of the easiest manicures to do and I definitely will be doing this again!
Friday, August 3, 2012
31 Day Nail Art Challenge, Day Three, Yellow Nails
So I originally planned on doing my nails with tips that resembled lemons, like the manicure shown in this video by the super talented cute polish!


However, I kinda wasn't paying attention when painting my tips yellow and made a straight line with my yellow polish instead of a curved one and decided to just go with the flow and continue to do the same with the white lines, (with my Migi Nail Art pen of course.) For my base I used Revlon's Top Speed Sheer Cotton color and the yellow tips are Wet n Wild's The Wonder Yellows. Sheer Cotton is very, very sheer and I have to put on several coats to get the coverage I like and it never really seems to dry all that well. However, I love the color, so I always seem to come back to it. The Wonder Yellows is a shimmery, bright yellow and I used only one coat because it was over Sheer Cotton, but if it is anything like the other polishes in the collection, it should have great coverage.

After I had painted them I decided there wasn't quite enough yellow for a yellow nail day and decided to use my yellow Migi Nail Art pen to add dots to the bottom of the tips. The yellow from the nail art pen is more of a darker, truer yellow than that of Wet n Wild's. I think it would be too bright for my personal taste to use as a base color (that may always change lol), but I think The Wonder Yellows is a perfect (and beautifully shimmery) yellow for any occasion.

Overall I liked how this manicure turned out, but I don't think it will be my favorite in the challenge. I don't wear the color yellow very often, on my nails or otherwise, do you?
Thursday, August 2, 2012
31 Day Nail Art Challenge, Day Two, Orange Nails
So for the second day I decided to use the Wet n Wild 9.0.2.1. Orange. It is a very light, shimmery polish that was completely opaque after three or four coats.I love how it looks in the light and it did dry fairly quickly. On the tips of the nails I wanted to do a "paint drip" effect and used my Migi Nail Art white pen to free hand the design.
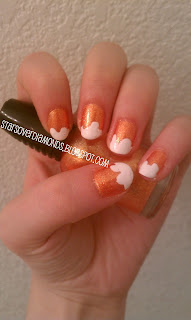 I had kind of wanted a "creamsicle" look and I am pleased with how it turned out. I believe this is a cute summer manicure. What do you think?


Wednesday, August 1, 2012
Polish Haul && 31 Day Nail Art Challenge, Day One, Red Nails
So today is going to be a rather long blog post...
To start off, I am going to show you a rather good deal I received from Walgreens on eight nail polishes that came in a cute, clear case for only ten dollars!
The case is rather large, and could be used for storing various things. I think I will start storing my acetone, cotton balls, and other larger items in there because they take up space in my current nail polish container. (It is kind of cheap though because it is all plastic.)
 There are two types of nail polishes in the package. The cube like polishes are Wet n Wild's megalast "salon nail color". The cylindrical polishes are Wet n Wild's fast dry nail color.
 For the second half of my blog post, is the start of a 31 Day Nail Polish Challenge I found over at Galactic Lacquer (who is a fantastic blogger btw!).
 For the first day of red nails, I decided to try out the I Red a Good Book polish i got in my case. The coverage was fantastic with the "manicurve" brush and was completely opaque in two coats. I then decided to do an accent nail in the design of a ladybug using my Migi Nail Art Pens. I think this was a cute, simple way to start this long challenge!!
 I am definitely looking forward to expanding my horizons over the course of this challenge. xx.
To start off, I am going to show you a rather good deal I received from Walgreens on eight nail polishes that came in a cute, clear case for only ten dollars!
The case is rather large, and could be used for storing various things. I think I will start storing my acetone, cotton balls, and other larger items in there because they take up space in my current nail polish container. (It is kind of cheap though because it is all plastic.)

 |
From left to right: Megalast polishes; I Red a Good Book, I Need a Refresh-Mint, Wet Cement, On a Trip. Fast Dry polishes; 9.0.2.1. Orange, The Wonder Yellows, Sage in the City, FuchsiaRama
*btw: How cute are the fast dry polish names?! All versions of t.v. shows :)
The top of the megalast colors s have a sticker that says the polish has a "manicurve pro brush". The brush is a lot thicker than I'm used to, but I believe it did a great job at coverage and was easy to use.
|


Thursday, July 19, 2012
Batman Nails
So in honor of seeing the Batman movie Friday night, I decided to use some Batman temporary tattoos laying around to do my manicure! I used Sally Hansen Xtreme Wear Mellow Yellow as my base on all my nails. On my thumb, pinky, and middle finger I applied temporary tattoos I got from the kid party section at Walmart. On my ring and pointer finger I did striping with some thick nail tape I had lying around with Migi Nail Art Black polish.


After one of my nails chipped while I was moving some things around, I decided to try a little water marbling with yellow and black Migi Nail Art polish. Needless to say it didn't turn out that well, but I don't think it was too bad for my first attempt.

Are you going to go see the new Batman movie?
Subscribe to:
Posts (Atom)